You can draw your own patterns as foundation patterns. But if you use the EQ7 package, you can also print the foundation patterns. When drawing your own foundation patterns, paper with inch divisions is very handy. It saves you a lot of time. You can buy this paper, but it’s also available for download. You can simply print out the paper and then draw the pattern on it. You can download paper with inch divisions here.
|
We’re going to work on a block from the 365 Challenge using a foundation pattern. It’s the block from January 30th. The block, including seams, is 3.5 inches x 3.5 inches. That’s quite small, so you need to work very precisely. Every mistake adds up, except when you use a foundation pattern. With a foundation pattern, you sew on a foundation of very thin paper, also known as tea bag paper. It’s strong enough to use as a foundation, somewhat transparent, and yet easy to remove. A pattern is drawn on this paper. This pattern can be an entire block or a part of a block, depending on your block. With this method, you sew one piece of fabric over the parts already sewn onto the pattern. This only works well if the next piece overlaps the parts already sewn on. It sounds a bit tricky, but if you follow the instructions, it will become clear.
|
| Since the pattern is drawn on the foundation and you follow the lines of this pattern, the total deviation when sewing is smaller. This is useful if you have trouble maintaining the correct seam width or cutting the pieces to the correct size. The block we are going to make cannot be assembled all at once as a foundation pattern. We will make three parts and later sew those parts together. To the right, you can see what those parts look like. Letters with numbers behind them are indicated in the pattern. All pieces from one part start with the same letter. The first piece on this pattern has the number 1 behind the letter, the second has the number 2, and so on. |
We start by transferring the pattern onto the paper. We also transfer the text. This block is symmetrical, so it doesn’t matter if we sew on the front or the back of the paper. If the block is not symmetrical, it does matter. In that case, you must transfer the pattern in mirror image. You will be sewing on the back of the piece. The paper must be placed on the fabric so that you can read the text.
|
Now we place the first piece correctly on the pattern. The pieces can all be cut generously, which makes this technique a bit easier. We place the first piece neatly against the alignment line. This is actually the line of the pattern part including a 1/4 inch seam allowance. The piece should be placed with the right side down. If you turn it over, with the paper down, you should be looking at the right side of the fabric. We place the second piece, in this case, pattern part C2, against this piece. Place this piece with the right side of the fabric against the right side of the fabric of part C1. Now we sew the seam with the sewing machine. This is actually just the seam between pieces C1 and C2. The seam is sewn neatly along the indicated stitch line on the paper.
|
The side with the paper is visible when you start sewing. Make sure you start sewing at the outer edge of the pattern and also end at the outer edge. This is actually the seam allowance. Sew as much as possible in a color that blends with the color of the pieces.
|
Once you’ve sewn the two pieces together, press the top one to the right side. Then cut or trim the seam to about 1/4 inch. Be sure to fold the paper away so you don’t accidentally cut it. Sometimes you need to carefully tear the paper a little from an earlier sewn section before you can trim the newly sewn seam to size. Do this carefully. Ensure that the previously sewn seams are not pulled apart.
|
Now it’s time for pieces C3 and C4. Make sure you cut or trim all the pieces generously. This is the beauty of this method. Because the pieces can be slightly larger, you have more leeway. If you’re short a millimeter somewhere, it’s not a big deal. Keep repeating these steps until you’ve completed the pattern. So:
- Place the piece.
- Sew neatly over the line on the paper.
- Press the sewn piece to the right side.
- Trim the seam to 1/4 inch.
|
If you have larger pieces, you might sometimes not see from the back if the next piece is placed correctly. You can then hold the piece against the light. This way, you can see through the fabric whether the piece is correctly positioned..
|
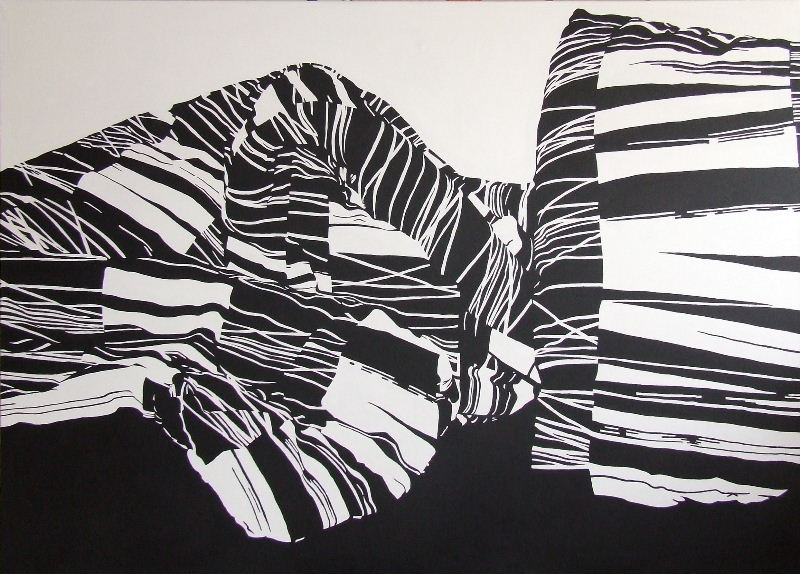
Once you’ve finished this pattern part, it will look something like the picture. Not very pretty. But fortunately, the correct pattern is on the back of the piece.
|
In the final step, we trim this piece neatly. And once we have all the parts finished, they just need to be sewn together. The original pattern is visible on the back. Trim the pattern piece neatly along the outer lines of this part. You can take a slightly larger seam allowance if you prefer.
|
Now it looks much better. And because you cut or trimmed it to the size of the drawn pattern, the outer dimensions of this piece must be correct. How neatly the individual pieces match depends on how accurately you sewed along the lines on the paper.
|

")
")
 Sometimes it’s very difficult to make a block neatly. Every small mistake in measurements adds up. A bit of imprecise cutting, a bit of imprecise sewing—it’s very annoying. A method that might help is the foundation patterns or paper piecing method. With this method, you use a (usually paper) foundation on which the pattern is indicated. You sew your block together on this foundation.
 You can draw your own patterns as foundation patterns. But if you use the EQ7 package, you can also print the foundation patterns. When drawing your own foundation patterns, paper with inch divisions is very handy. It saves you a lot of time. You can buy this paper, but it’s also available for download. You can simply print out the paper and then draw the pattern on it. You can download paper with inch divisions here.
 We’re going to work on a block from the 365 Challenge using a foundation pattern. It’s the block from January 30th. The block, including seams, is 3.5 inches x 3.5 inches. That’s quite small, so you need to work very precisely. Every mistake adds up, except when you use a foundation pattern. With a foundation pattern, you sew on a foundation of very thin paper, also known as tea bag paper. It’s strong enough to use as a foundation, somewhat transparent, and yet easy to remove. A pattern is drawn on this paper. This pattern can be an entire block or a part of a block, depending on your block. With this method, you sew one piece of fabric over the parts already sewn onto the pattern. This only works well if the next piece overlaps the parts already sewn on. It sounds a bit tricky, but if you follow the instructions, it will become clear.
 Since the pattern is drawn on the foundation and you follow the lines of this pattern, the total deviation when sewing is smaller. This is useful if you have trouble maintaining the correct seam width or cutting the pieces to the correct size. The block we are going to make cannot be assembled all at once as a foundation pattern. We will make three parts and later sew those parts together. To the right, you can see what those parts look like. Letters with numbers behind them are indicated in the pattern. All pieces from one part start with the same letter. The first piece on this pattern has the number 1 behind the letter, the second has the number 2, and so on.
 We start by transferring the pattern onto the paper. We also transfer the text. This block is symmetrical, so it doesn’t matter if we sew on the front or the back of the paper. If the block is not symmetrical, it does matter. In that case, you must transfer the pattern in mirror image. You will be sewing on the back of the piece. The paper must be placed on the fabric so that you can read the text.
 Now we place the first piece correctly on the pattern. The pieces can all be cut generously, which makes this technique a bit easier. We place the first piece neatly against the alignment line. This is actually the line of the pattern part including a 1/4 inch seam allowance. The piece should be placed with the right side down. If you turn it over, with the paper down, you should be looking at the right side of the fabric. We place the second piece, in this case, pattern part C2, against this piece. Place this piece with the right side of the fabric against the right side of the fabric of part C1. Now we sew the seam with the sewing machine. This is actually just the seam between pieces C1 and C2. The seam is sewn neatly along the indicated stitch line on the paper.
 The side with the paper is visible when you start sewing. Make sure you start sewing at the outer edge of the pattern and also end at the outer edge. This is actually the seam allowance. Sew as much as possible in a color that blends with the color of the pieces.
 Once you’ve sewn the two pieces together, press the top one to the right side. Then cut or trim the seam to about 1/4 inch. Be sure to fold the paper away so you don’t accidentally cut it. Sometimes you need to carefully tear the paper a little from an earlier sewn section before you can trim the newly sewn seam to size. Do this carefully. Ensure that the previously sewn seams are not pulled apart.
 Now it’s time for pieces C3 and C4. Make sure you cut or trim all the pieces generously. This is the beauty of this method. Because the pieces can be slightly larger, you have more leeway. If you’re short a millimeter somewhere, it’s not a big deal. Keep repeating these steps until you’ve completed the pattern. So:
 If you have larger pieces, you might sometimes not see from the back if the next piece is placed correctly. You can then hold the piece against the light. This way, you can see through the fabric whether the piece is correctly positioned..
 Once you’ve finished this pattern part, it will look something like the picture. Not very pretty. But fortunately, the correct pattern is on the back of the piece.
 In the final step, we trim this piece neatly. And once we have all the parts finished, they just need to be sewn together. The original pattern is visible on the back. Trim the pattern piece neatly along the outer lines of this part. You can take a slightly larger seam allowance if you prefer.
 Now it looks much better. And because you cut or trimmed it to the size of the drawn pattern, the outer dimensions of this piece must be correct. How neatly the individual pieces match depends on how accurately you sewed along the lines on the paper.