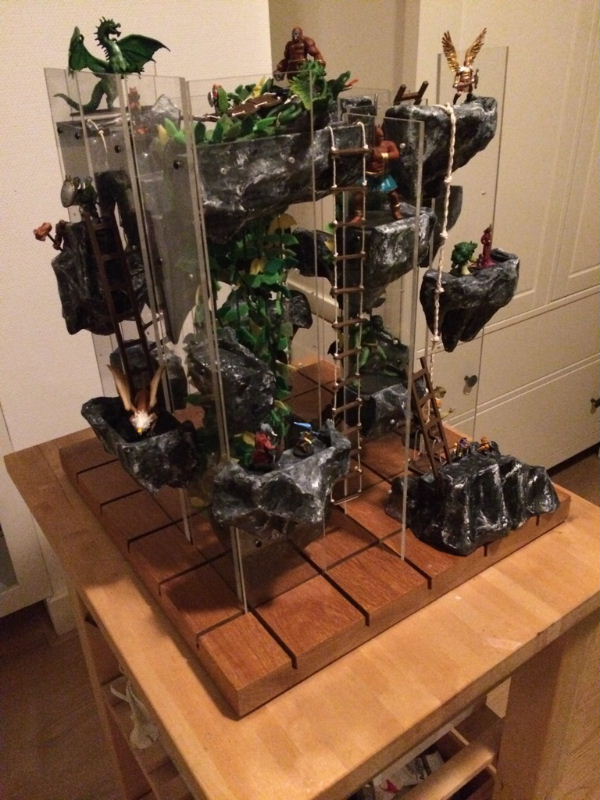
| The base for the battleground is a sturdy wooden plank of approximately 40 by 40 cm and 3 cm thick. I had slots made in this plank. This was done with a circular saw set only slightly above the surface. The slot is 1.5 cm deep. The center-to-center distance between the slots is always 7.5 cm, and the slot is 5 mm wide. A 7.5 cm distance between the slots corresponds to a grid on a battle map of 3 by 3 squares. This way, I can't make everything, but I do have quite a few options. |
| In the slots, I'm placing Perspex strips that I've had lying around in the garage for a while. They are strips of just over 40 cm long, 8.5 cm wide, and 4 mm thick. I have a total of 12 strips. 6 of the strips are slightly shorter, but that doesn't matter much for the process. Holes have been drilled in the strips. I kept the drill speed fairly low and used a drill bit of about 3mm. The screws that will be used are M3, and they should fit well through the holes. As seen in the diagram next to this, the holes are drilled symmetrically relative to the center of the strip. When determining the bottom holes, you need to take into account the part of the strip that disappears into the slot and the height of the part of the supports that is still above the screw. The holes are horizontally spaced 5 cm apart and vertically spaced 7.5 cm apart. |
| Here you can see a Perspex strip with some holes drilled into it, a 3D printed support attached to the Perspex strip, and the strip placed in a slot in the base plate. The supports serve as the foundation for various elements that need to be attached to the strips to ultimately build a battleground. |
| In this support, 3 medium-sized figurines fit, but I've made various supports. The .STL files of the supports are available for download. Just remember that these will only fit if you maintain the same dimensions for the slots in the wooden base plate and the thickness of the Perspex strips. When you place the strip in the base plate, you'll notice that there is some play. The strip may even hang slightly crooked. That's okay. Once you've attached all the supports, the whole thing will be sturdy enough, and you won't have that problem anymore. The play is actually nice because there may be some variation in the hand-drilled holes. |
| Once the paper protective strips are removed from the strips, it looks like the photo next to this one. A transparent strip with a support on it. You can see under the support two sets of two holes. The support could have been placed there as well. The support can also be attached to two Perspex strips. At least one screw should be used in each strip. It is even recommended for stability. |
| The battleground is constructed with multiple strips, and supports can be placed at different heights on a strip. You can see that I have strips of different heights. That doesn't matter for the process. I happened to have 6 strips of both sizes lying around, so I used them. |
| The strips can be placed in the slots in two directions, allowing for flexibility in the choice of your setup. Here you can see the holes clearly. When placing the strips, you need to set them apart so that the horizontal distance between the holes is again 5 cm. It takes a bit of puzzling, but once you try it, you'll find that it's actually quite logical. |
 A 2D map for D&D is cool, but a modular 3D environment seemed even more fun to me. I put something together with materials and equipment that I had available.
 A 2D map for D&D is cool, but a modular 3D environment seemed even more fun to me. I put something together with materials and equipment that I had available.