
")
")
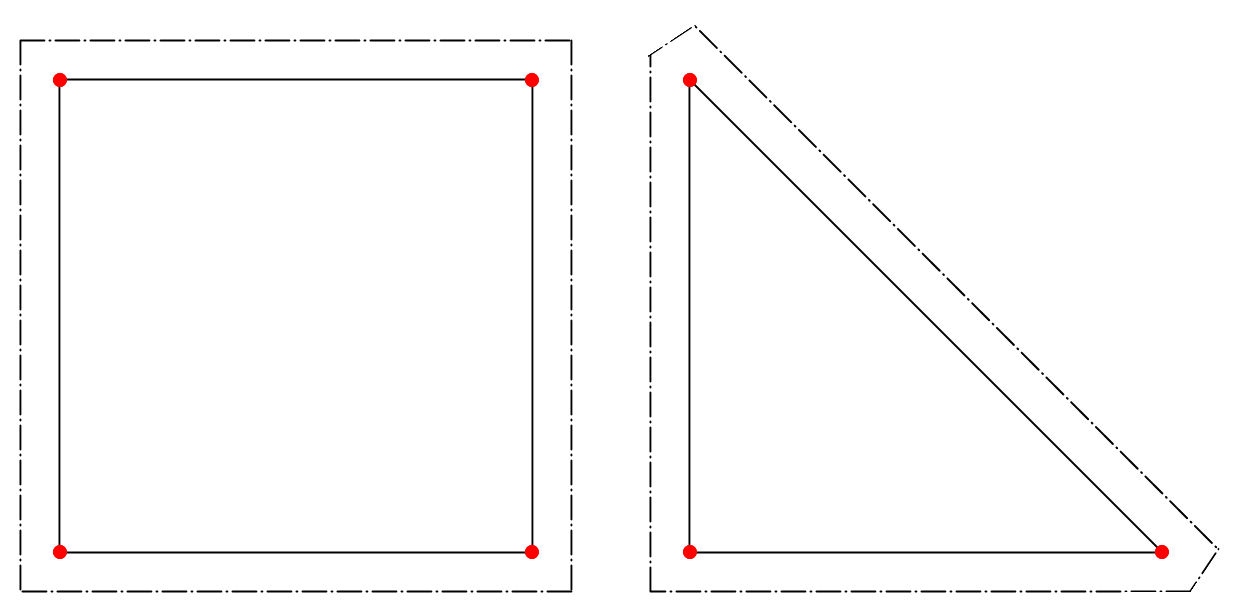
 During this exercise, we will make a little star, called "Pinwheel". I'm working here in centimeters, but you can also work in inches. You'll need to adjust the sizes of pattern pieces accordingly. First, we'll create templates so we can cut the correct pieces of fabric. As you can see, the pattern consists of 1 square and 16 triangles. All triangles are the same size. The total size of the Pinwheel is 15 by 15 cm. During this exercise, we will make a little star, called "Pinwheel". I'm working here in centimeters, but you can also work in inches. You'll need to adjust the sizes of pattern pieces accordingly. First, we'll create templates so we can cut the correct pieces of fabric. As you can see, the pattern consists of 1 square and 16 triangles. All triangles are the same size. The total size of the Pinwheel is 15 by 15 cm. |
| Je hebt het volgende nodig: |
|
|
|
 |
| We use the grid paper, ruler, and pencil to draw the pattern. We draw the square and 1 triangle. A seam allowance is added around the actual pattern. In this first lesson, we work in centimeters, and the seam allowance is 0.5 cm. This pattern, including the seam allowance, is cut out and glued onto sandpaper with the Pritt stick. Note, the sharp points of the triangle are slightly trimmed. Now, the glued patterns are cut out of the sandpaper again. This creates templates. We use sandpaper because it's inexpensive and the rough surface prevents the templates from sliding on the fabric. You now have templates. In each template, a hole needs to be pricked at the corner points of each pattern using the awl. Place the template on the mat for this, so you don't damage the table. If you're working in inches, you can use a width of 2 inches and a seam allowance of 1/4 inch for a comparable block. The block will be slightly larger, as will the individual pieces. Otherwise, the technique remains the same. |
 |
Now, we transfer the templates onto the fabric. We do this with a pencil on the back of the fabric. Place the templates on the fabric and trace a line along the outline of the template. Without shifting the template, mark a dot on the fabric through the holes. Press firmly so the dot is visible. Now, remove the templates from the fabric and draw a line between the dots on the fabric using a ruler so that the pattern is clearly visible. Draw the following patterns on the wrong side of the fabric:
|
 First, pin the pieces together. Not all at once, but two pieces at a time, then sew those into a strip later. The strips are sewn together to form a block. Once you've pinned the pieces (with right sides together), sew them together by hand with small stitches and neatly along the lines. The seam allowance is not sewn down. First, you make blocks from all the triangles according to the pattern shown next to this. First, pin the pieces together. Not all at once, but two pieces at a time, then sew those into a strip later. The strips are sewn together to form a block. Once you've pinned the pieces (with right sides together), sew them together by hand with small stitches and neatly along the lines. The seam allowance is not sewn down. First, you make blocks from all the triangles according to the pattern shown next to this. |
 And from these blocks, you make strips. Always press the seam with your fingers to one side, preferably the darkest color. The seam will then be stronger and less visible. Try to always see strips in your pattern, it's the easiest way to work. When all pieces are sewn together, you'll have a block of 19 by 19 cm, as there's still a seam allowance all around. Once the blocks are incorporated into a larger whole, they measure 18 cm by 18 cm. And from these blocks, you make strips. Always press the seam with your fingers to one side, preferably the darkest color. The seam will then be stronger and less visible. Try to always see strips in your pattern, it's the easiest way to work. When all pieces are sewn together, you'll have a block of 19 by 19 cm, as there's still a seam allowance all around. Once the blocks are incorporated into a larger whole, they measure 18 cm by 18 cm. |
| Multiple strips combined into a large pieceBy combining multiple Pinwheel blocks into one, you can create a larger piece. You can choose to add strips between the blocks, called sashings, or you can sew the blocks together without intermediate strips. You see an example next to it. When you finish this large piece, you'll have the "top" of your quilt ready. |