
")
")

The material.Papier-mâché is a material made from paper mixed with glue. It's used to create simple artworks with irregular shapes, such as decorative pieces, masks, or ornaments. The strength and water resistance depend on the type of glue used, the framework, and any additional treatments. The name "papier-mâché" originates from France. French women used to buy waste paper from publishers and bookbinders and chewed it to soften it. Hence the name "papier-mâché," which literally translates to "chewed paper" in French. |
| That was before the invention of machines that could grind paper finely. Despite its French name, papier-mâché is not a French invention. Paper was invented in China in the 2nd century AD. It wasn't until the end of the 10th century that paper replaced the fibers of the papyrus plant, which had been used since ancient Egypt. So, paper replaced papyrus but adopted its name! In France, papier-mâché was already used in the 16th century for doll heads, but it wasn't until the 17th century that French craftsmen, as the first in Europe, became interested in papier-mâché for commercial purposes. |
 Papier-mâché can be divided into two categories: Papier-mâché can be divided into two categories:
Of course, you can also combine both methods. For both methods, you use the same materials: paper and glue. |
The glue.There are different types of glue used in papier-mâché. Here's an overview:
All types of glue can be used for both the pulp and layering techniques. |
The paper.Various types of paper can be used for papier-mâché. While newspapers are commonly used, other options include:
Each type of paper, influenced by its color or texture, can create different effects in the papier-mâché project. |

The method using layers of paper:For working in layers, the paper is torn or cut into small pieces or strips. These are then coated with glue and applied to a base form. Air bubbles are smoothed out with fingers or a brush. Avoid applying more than about 3 layers at a time to prevent excessive drying time. Then, you can build layer by layer until you achieve the desired thickness and shape. |
 Handles and similar features can be cut out from cardboard. Tape these onto your form and then cover the entire structure with several layers of papier-mâché. After drying, which may take several days, you can remove the base form if desired. Then, you can proceed to further refine the shape if needed. Handles and similar features can be cut out from cardboard. Tape these onto your form and then cover the entire structure with several layers of papier-mâché. After drying, which may take several days, you can remove the base form if desired. Then, you can proceed to further refine the shape if needed. |

The method using paper pulp.Paper-maché pulp is made by shredding and soaking paper (such as newspaper), causing it to fall apart. Additionally, glue is added. While it's still soggy, the piece is shaped, possibly using a mold or form. Once the paper-maché has dried, the work is finished.Supplies needed for making pulp:
|
 Procedure for making pulp: Procedure for making pulp:
|
 Types of pulp: Types of pulp:
You may need to experiment with these to achieve different textures for your papier-mâché object. Pulp can be molded into almost any shape and is lightweight and strong. Objects made from pulp take much longer to dry than those made from strips of newspaper. |
 Papier-mâché can be used without a mold, but it makes it a difficult and fragile material to handle. Various objects can be used as molds, such as: Papier-mâché can be used without a mold, but it makes it a difficult and fragile material to handle. Various objects can be used as molds, such as:
|
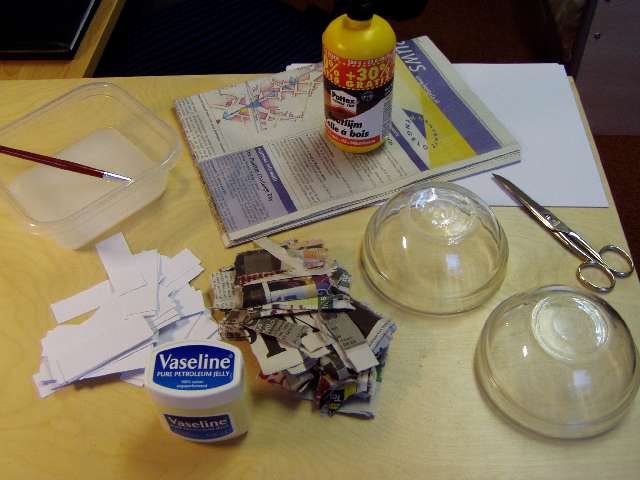
 To prevent the papier-mâché from sticking to the mold, it should be coated beforehand. This can be done with: To prevent the papier-mâché from sticking to the mold, it should be coated beforehand. This can be done with:
|
These products should all be applied thinly as they leave a layer on the workpiece. Other options are:
You can also wrap the papier-mâché around a frame. This frame can then no longer be removed. You can use all kinds of materials to make a frame. Some possibilities:
Make your frame from the necessary materials. Stick these together with glue or tape, and cover them with several layers of papier-mâché. |

Finishing details:
|